


Hints and tips for using Dyne Pens
Getting the best out of
simple surface energy measurement
Understanding a substrate’s
surface energy is a worthwhile part of any bonding or coating process – or any
process which involves adhesion. During the specification phase, there is a
need to understand surface energy and wettability in a quantitative way, to
ensure adhesion. In the production phase, measuring surface energy takes on a
more qualitative and process control function. Dyne Pens and Inks can be used
to assess surface energy and wetting. Here, Alison Fox, Sales Manager of Dyne
Testing, an Intertronics brand, outlines some hints and tips when using Dyne
pens.
If you are printing,
painting, bonding or sealing, good adhesion is an essential issue. If you do
not understand the surface energy of the adhesive material and the substrate,
and the difference between them, you risk issues with wetting, the quality of
adhesion, and complete coating coverage. This applies in material and substrate
specification phase, where you might want quantitative data. In the production
phase, checking surface energy can help you determine process failures (e.g.
cleaning, surface preparation like corona or plasma treatment) or other
unintended surface changes.
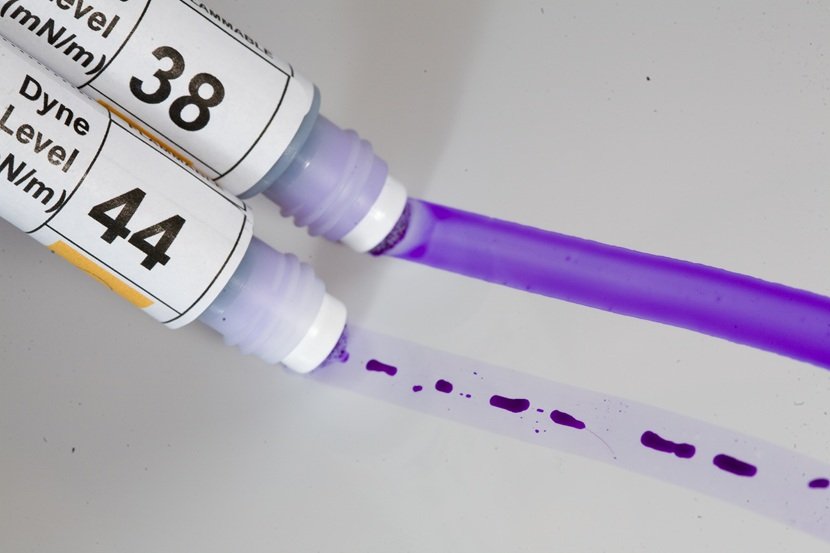
Dyne pens are handheld
surface energy analysis tools that can be used in any environment on solid
substrates. They are available in different “Dyne” levels. When a Dyne test pen
is applied to the surface, the ink will either form a continuous film on the
surface, or pull back into small droplets. If the liquid remains a film for
three seconds, the surface energy of the substrate has a minimum value of that
Dyne pen ink value. If the ink draws back, then the surface energy of the
substrate is lower than that of the ink. The exact surface energy can be
determined by applying various Dyne pens or inks, which provide a rapid
indication of the surface energy of the material. Alternatively, by using a
Dyne pen to test for a minimum acceptable Dyne level, the technique becomes a
simple but effective go/no-go process.
By consistently following
the standardised test procedure and choosing the Dyne pen range suitable for
the application, users see consistent and repeatable results. With the
advantage of being quick and relatively inexpensive, Dyne pens have become a
popular and ubiquitous tool in many industrial and laboratory settings. To help
get the best results, here are some hints and tips.
Avoiding
contamination
Common mistakes when using
the pens include testing on a contaminated area of the material. It is
important that tests take place on areas that haven’t been handled. If users
test on areas contaminated by fingerprints, the results will likely be inaccurate
and inconsistent across the material. This leads to rejections, wasted
resources, and reduced productivity.
Visual checks are usually
enough to identify contamination like grease marks, dust, or fingerprints.
Testing in these areas will not give a true analysis of the underlying
substrate’s surface energy. It is good practice to test in three areas of the
substrate sample; inconsistent results will indicate some form of localised
problem (contamination, surface treatment failure, etc), whereas identical results
will give confidence in the validity of the measurements.
We recommend that tests are
conducted at room temperature and humid environments are avoided. Evaporation,
water vapour, and airborne contaminants can all affect the Dyne level result.
For the same reasons, we recommend that Dyne pens are stored at ambient
temperatures with the caps on to ensure complete shelf life.
Pen
choice
It is a good idea to use
Dyne pens with a “valve tip” applicator, a type of pen that has a non-return
valve. When pressing the tip firmly down, the valve is opened and fresh ink
floods the applicator tip. The valve protects the testing ink inside the pen
from humidity and from substrate contaminants which could otherwise wick up
into the ink reservoir. It also means low levels of evaporation of volatiles
from the ink, and prevents ink leakage. Unlike those based on a normal felt-tip
marker pen, the valve tip applicator protects the ink and its integrity –
keeping the results accurate for the lifetime of the pen and ensuring the best
shelf life.
Material
use
While Dyne Pens are
suitable for most non-absorbent materials, including on polyethylene and
polypropylene films, it is important for users to initially test on scrap
substrate. This is to check the ink from the pens does not adversely react with
the material being tested, soak into the material, or cause it to swell. On
soft grades of PVC, the ink from the pen can react with the polymer and cause
inaccurate results. A chemical reaction between the test fluid and the
substrate invalidates results altogether.
It is important that the
test fluid does not alter the substrate’s surface properties. For example, if
the test fluid permeates a fibre substrate, such as paper, and causes swelling,
results will indicate unrealistically easy wetting.
Timing
is everything
The standard procedure
entails applying the test ink and watching to see if it wets the substrate and
for how long. An accurate test result will be with an ink that stays in a
continuous film for between one and three seconds. If the ink stays wetted for
more than three seconds, using a higher Dyne level test pen is indicated to
narrow down the actual surface energy.
Summary
Dyne pens have found
countless applications throughout industry, in research, product development,
process control, incoming inspection, and finished product verification.
Following the standard testing procedure is essential to successful use. Dyne
Pens provide an analysis of a substrate surface energy, giving fast and
cost-effective results. To find out more about Dyne Testing’s range of Dyne
pens, visit www.dynepens.co.uk or contact info@intertronics.co.uk
Related Articles


Current Issue

10-2026
